Wedding card using Spellbinders Die Oval Ironwork byMonti thepolkadotpinecone

DSC02905DSC02907DSC02909

Love using die cuts to make cards. I used some silver foil card stock to die cut these from the Spellbinders Oval Ironworks die set. I layered them using foam tape and stamped a sentiment with black ink on the inside oval. I added gems in the four spots and then tied some silver ribbon in a bow to the top of the card. As a finishing touch I adhered a black and white striped butterfly to the bottom left section of the card. I adhered all the elements onto a top folding white card base that measure 4.25 by 5.5. So simple but so gorgeous.

My Monthly Hero card kit 2 cards byMonti thepolkadotpinecone

DSC02902DSC02899

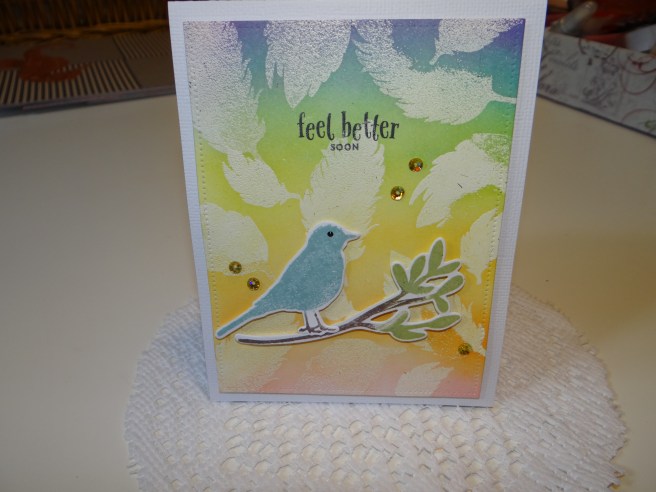
Made two cards using the Hero Arts My monthly hero card kit for February. The first card I stamped and embossed the feather stamps from the kit with white embossing powder and the did an emboss resist with my distress oxide inks in a rainbow order. Next I stamped the bird and branch images using the inks that came in the kit and then die cut them with the dies. I adhered them on the panel with foam tape and then added some sequins from a previous hero arts kit and then added a dot of Ranger black enamel for the birds eye. I trimmed my whole panel using a stitched rectangle die from Avery Elle then adhered the whole thing with foam tape to a top folding white A2 size card base.

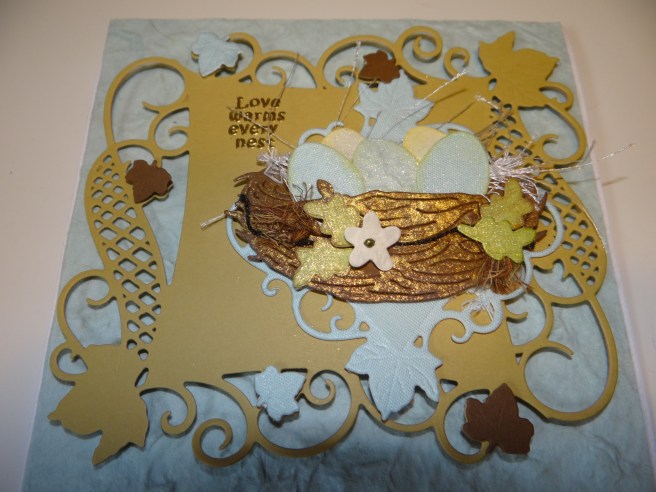
The second card I die cut some eggs, nest , and leafs from the My Monthly Hero kit. I inked the edges and then wrapped some white eyelash yarn around the nest to look like nesting material and then added the eggs inside. I adhered some more brown twine on the outside of the nest and then added the flower and leaves. I spritzed the whole nest with some gold spray that was from a previous months kit. I then used some Spellbinders decorative curved squares to cut a couple of layers of paper from blue and green card stock. I layered those with foam tape and then added my nest on top. I stamped and embossed the sentiment in gold which was from a stamp set by Crafty Secrets. I added the whole thing on top of a piece of blue mulberry paper and then affixed that to a white top folding card base that measures 5×5.

Hope you like them, I had a lot of fun making them.

Birthday Pocket Letter byMonti thepolkadotpinecone

This slideshow requires JavaScript.

Birthday themed pocket letter for February swap with Marsha. I used the Bella Rouge paper stack from Pink Paislee.

I also made a cute little matching box to fill with goodies using the Box w/scallop flap from Sizzix and some coordinating paper from the same paper line.

I attached a really cool charm on the top corner of the pocket letter that had tassels, hearts and ribbons.

#SSS February card kit Crafty Friend stamp set

DSC02856

Crafty card I made using the #SSS February card kit and Crafty Friend stamp set. I used the orange patterned paper from the kit as my base and then added a piece of white card to stamp my scissors and dotted line with stamps from the kit in a rainbow color using Tim Holtz distress oxide inks. I then stamped the hello greeting using another stamp from the set and then mounted on top of another label I cut from black and white striped paper. I mounted that with foam tape and then added the scissors wood piece from the kit on top. In the top right corner I cut a couple of banners from patterned paper and then stapled them in place. I finished off the card by adding some dots with my perfect pearls in Pumpkin color to match the orange patterned paper I used for the base. I then mounted the whole thing on a top folding white card base for a finished A2 size card.