Tag card using Spellbinders small die of the month die set. #NeverStopMaking

IMG_1470

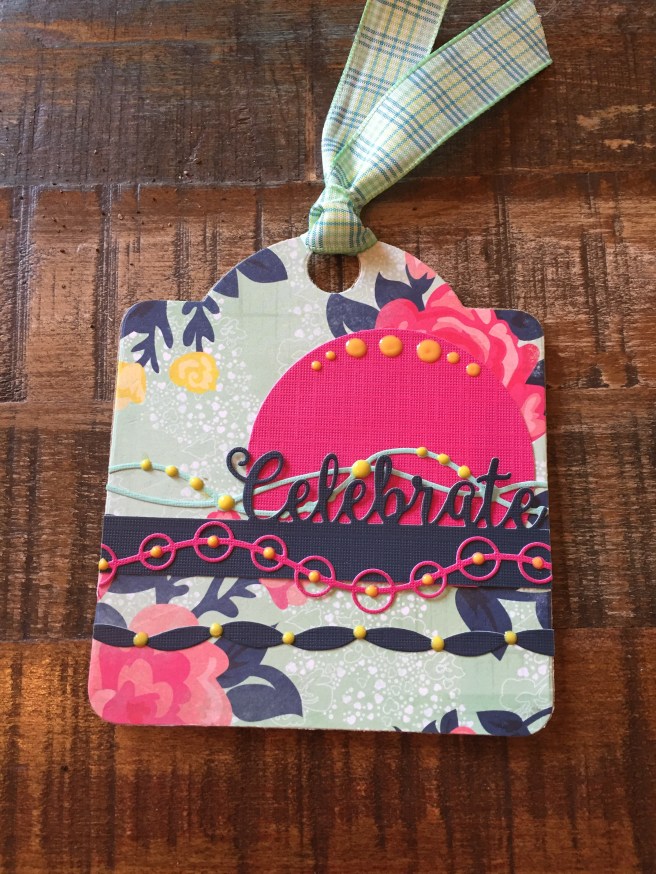
Another project using the Spellbinders small die of the month May 2018 set. I made this tag card using the Celebrate word from the die set.

I cut the tag from some patterned paper from Crate paper and some chipboard and layered them together for strength. I tied a piece of ribbon on top to hang the tag. I layered some die cuts, including the celebrate word cut on top of the pink circle. Then I applied some Nuvo drops in lemon yellow to finish  off the card. I also add a gift card pocket from Lawn Fawn  onto the back of the tag so I would have a place to hold a gift card. I can just insert this whole tag into an envelope and deliver it like that or I could tie it to a gift. By the way I did a process video on this but some how messed it up and didn’t get it uploaded properly. I’ll do better next time.


Thanks for visiting and if you haven’t done so yet hit the subscribe button for notifications of future blog posts. If you have any questions leave them in the comment section below and I will get back to you.

Rainbow card using Spellbinders small die of the month May 2018 #NeverStopMaking

IMG_1466

#NeverStopMaking Spellbinders small die of the month set. I made this rainbow card using the Hello die from the set and I think it turned out so pretty. It was very easy to make. I die cut the hello from each of the rainbow of colors of card stock and then staggered them onto a piece of white card stock. I then stamped a sentiment from Simon Says Stamp Best Ever stamp set and heat embossed it with white embossing powder.


DSC03038

I trimmed out the sentiment and then adhered it to the top Hello strip. I finished it off with just a little bit of embellishments because I felt that there was already enough going on with all the color strips, so I adhered some clear sequins from Simon Says Stamp.

These dies could be used in so many ways the possibilities are endless. Hope you enjoyed, leave me a comment if you have any questions and please subscribe if you haven’t already done so.

Simon Says Stamp 2 cards using card kit

DSC03030

For my first card using the SSS monthly card kit I used the ink cubes included and stamped some of the flower images from the stamp set and then coated them with clear embossing powder. I cut a circle from black card stock and stamped one of the greetings from the set and then white heat embossed it. I attached it to the front of the card and then added a few of the puffy stickers included in the kit around the edge of the black circle. I cut a piece of the patterned paper form the kit slightly bigger than the stamped piece and adhered it to the top. I adhered the whole piece to a top folding white A2 size card base. Super simple and easy adding only products from the kit.

IMG_1397

I loved making this card. I cut a label shape from a piece of white card stock and then stamped around the edges with stamps from the kit using the ink cubes included. I mounted that on a slightly larger piece of the patterned paper from the kit with foam tape and then adhered that to a top folding white card base. I used the heart word and shadow die included in the kit to cut out the word with white paper and then ink blended on top. I cut the shadow from black card stock and then adhered the two together and placed them in the center of the label shape. I also stamped in black ink the little sentiment above the heart word die cut. I adhered the puffy stickers around the edge of the cut out shape and then added an acrylic heart sticker to the lower corner and then placed a few dots around with black Nuvo crystal drops. That finished off my second card, both were super easy and pretty much used only items from the kit.

DSC03028

These are the items that are included in this months kit. They kits are really fun because you  get to try lots of new products and it’s such fun to go to the mail box and find a package of happy mail.