#SPELLBINDERS #NEVERSTOPMAKING CARD AND BOOK MARK CREATED WITH SMALL DIE OF THE MONTH BYMONTI #THEPOLKADOTPINECONE

IMG_1974

My first project using the small die of the month dies from Spellbinders was this sort of shabby chic card. I used one of the frame dies to cut out the brown piece of card stock and layered it on top of another spellbinders die that I had in my stash. I cut out the birds and flower from light pink felt and layered them on top. I added a little bling for the birds eyes and the flower centers. I layered that all on top of another piece of patterned paper from Prima and then mounted that on a brown card base.

IMG_1975

My next project I made a book mark from some pretty patterned paper in the long tag shape from Elizabeth Crafts die set. I cut out some more of the birds and the small flourishes that are from the Spellbinders set with gold foil paper and mounted them length wise on the tag and then I cut one of the other frames from the set in a coordinating patterned paper and mounted it cross ways on the tag and topped it off with the Love word punch from Teresa Collins. I added a gold hole reinforcer on the top and then ran the whole thing through my laminator and then cut out around the shape and tied some bakers twine on the top. I think they both turned out pretty cute. You can do a lot of things with dies that come in the set. Thanks for stopping by.

#SimonSaysStamp card kit Beautiful Flowers stamp set. SIZZIX embossing folder

DSC03071

This first card I made using some of the images in the Beautiful flowers stamp set by #SSS. I colored them in with my Zig clean color real brush markers. I trimmed that piece down and mounted it on top of a piece of the patterned paper from ModaScrap that came in the kit. I layered the Happy Birthday sentiment also from Simon that I cut three times and then stacked and glued together, I applied some novo shimmer  on top for some sparkle.  I mounted those words onto two coordinating pieces of ribbon( I made a mistake in stamping and had to fix it somehow so that was my solution, I think it worked pretty well). I stamped wishing you with tuxedo black ink from Momento above the Happy Birthday words and then finished off the card with three colors of Nuvo crystal drops apple green, violet galaxy, and sweet lilac. I mounted the entire piece on top of a top folding a2 size card 4.25 by 5.5.

DSC03073


The second card I used the Sizzix embossing folder and a piece of the gold foil paper both from the kit. The dimension on the embossing is amazing. I stamped and embossed the sentiments onto strips of paper and them mounted them with foam tape. I tied a piece of black and white bakers twine around the bottom portion of the card and then topped it with an epoxy heart from a previous Simon kit. I added this panel onto a top folding white card base a2 sized 4.25 by 5.5. I think it will be a pretty wedding card.


Tag card using Spellbinders small die of the month die set. #NeverStopMaking

IMG_1470

Another project using the Spellbinders small die of the month May 2018 set. I made this tag card using the Celebrate word from the die set.

I cut the tag from some patterned paper from Crate paper and some chipboard and layered them together for strength. I tied a piece of ribbon on top to hang the tag. I layered some die cuts, including the celebrate word cut on top of the pink circle. Then I applied some Nuvo drops in lemon yellow to finish  off the card. I also add a gift card pocket from Lawn Fawn  onto the back of the tag so I would have a place to hold a gift card. I can just insert this whole tag into an envelope and deliver it like that or I could tie it to a gift. By the way I did a process video on this but some how messed it up and didn’t get it uploaded properly. I’ll do better next time.


Thanks for visiting and if you haven’t done so yet hit the subscribe button for notifications of future blog posts. If you have any questions leave them in the comment section below and I will get back to you.

Rainbow card using Spellbinders small die of the month May 2018 #NeverStopMaking

IMG_1466

#NeverStopMaking Spellbinders small die of the month set. I made this rainbow card using the Hello die from the set and I think it turned out so pretty. It was very easy to make. I die cut the hello from each of the rainbow of colors of card stock and then staggered them onto a piece of white card stock. I then stamped a sentiment from Simon Says Stamp Best Ever stamp set and heat embossed it with white embossing powder.


DSC03038

I trimmed out the sentiment and then adhered it to the top Hello strip. I finished it off with just a little bit of embellishments because I felt that there was already enough going on with all the color strips, so I adhered some clear sequins from Simon Says Stamp.

These dies could be used in so many ways the possibilities are endless. Hope you enjoyed, leave me a comment if you have any questions and please subscribe if you haven’t already done so.

Simon Says Stamp 2 cards using card kit

DSC03030

For my first card using the SSS monthly card kit I used the ink cubes included and stamped some of the flower images from the stamp set and then coated them with clear embossing powder. I cut a circle from black card stock and stamped one of the greetings from the set and then white heat embossed it. I attached it to the front of the card and then added a few of the puffy stickers included in the kit around the edge of the black circle. I cut a piece of the patterned paper form the kit slightly bigger than the stamped piece and adhered it to the top. I adhered the whole piece to a top folding white A2 size card base. Super simple and easy adding only products from the kit.

IMG_1397

I loved making this card. I cut a label shape from a piece of white card stock and then stamped around the edges with stamps from the kit using the ink cubes included. I mounted that on a slightly larger piece of the patterned paper from the kit with foam tape and then adhered that to a top folding white card base. I used the heart word and shadow die included in the kit to cut out the word with white paper and then ink blended on top. I cut the shadow from black card stock and then adhered the two together and placed them in the center of the label shape. I also stamped in black ink the little sentiment above the heart word die cut. I adhered the puffy stickers around the edge of the cut out shape and then added an acrylic heart sticker to the lower corner and then placed a few dots around with black Nuvo crystal drops. That finished off my second card, both were super easy and pretty much used only items from the kit.

DSC03028

These are the items that are included in this months kit. They kits are really fun because you  get to try lots of new products and it’s such fun to go to the mail box and find a package of happy mail.


CARD USING #HERO ARTS #MYMONTHLY HERO CARD KIT

DSC03019

THIS IS THE 2ND CARD I MADE USING THE #HEROARTS #MYMONTHLYHERO CARD KIT. I STAMPED AND DIE CUT THE IMAGES FROM THE STAMP AND DIE KIT INCLUDED IN THE KIT AND THEN LAYERED THEM BEHIND SOME LAYERS OF HILLS AND GRASS. IN THE BACKGROUND I USED A STENCIL NOT INCLUDED IN THE KIT TO ADD A LITTLE INTEREST. I STAMPED THE GREETING FROM THE CARD KIT IN BLACK INK. I FRAMED THE CARD WITH A PIECE OF PINK CARD STOCK AND THEN MOUNTED IT ON A WHITE CARD BASE THE A2 SIZE SIDE FOLDING.

3 cards using the SSS card kit spring butterflies byMonti thepolkadotpinecone

IMG_1190

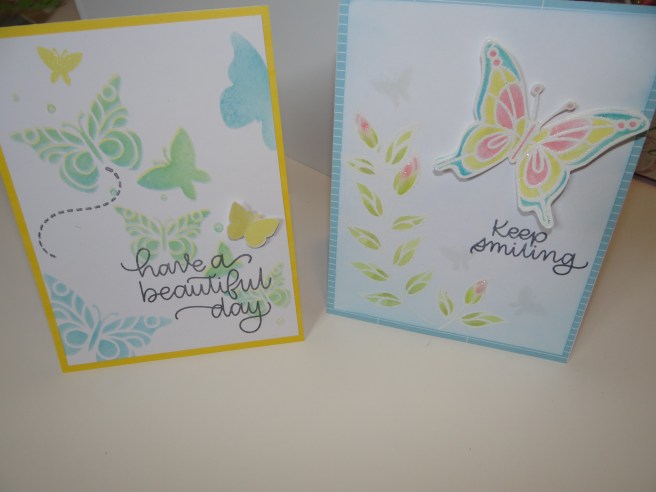
My first card I used the stencil included in the kit to add butterflies to my white base piece. I used the New Tim Holtz Distress Oxide Inks Squeezed lemonade and Mermaid Lagoon that were also included in the kit. Once I applied one color I shifted my stencil a bit to give a kind of shadowy effect and made some of the butterflies green by combining the blue and the yellow inks. I stamped the butterfly trail and the greeting from the stamp set in black ink. I stamped a solid butterfly from the stamp set and then fussy cut it out and adhered it to the card. I mounted the white base onto a yellow 5.5 by 4.25 top fold card base. The card was finished off with some clear Nuvo drops, I applied the drops on top of the little dots of the stamp so they took on the color of the ink.


DSC02998

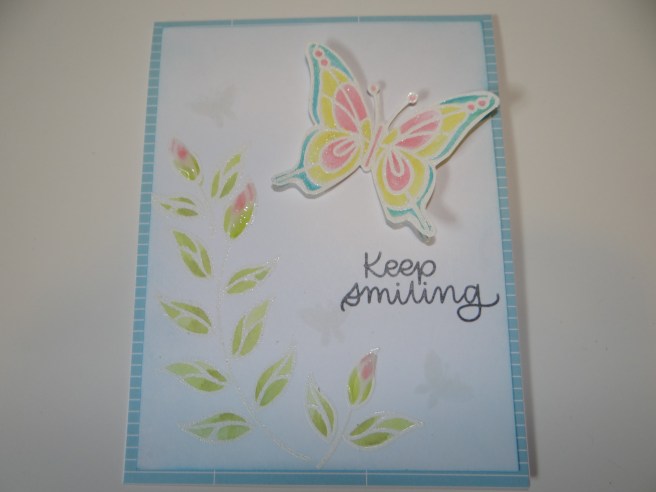
The second card I stamped with white embossing powder and then colored the images with my water brush and Tim Holtz distress oxide inks. I stamped the butterfly twice and cut out the second one and applied it over the top of the first with some dimensional tape. I stamped a couple solide butterflies with some versamark ink just for light inages in the background. I stamped a greeting from the set in black and then added the whole white panel to a piece of the patterned paper included in the kit and affixed the whole thing to a top folding 5.5 by 4.25 card base. I finished the card off by adding some clear Nuvo drops to the buds on the leaves for some shine.


DSC03002

This last card I started out applying some texture paste to the butterfly stencil and then cut a strip and added on top of the two layered doilies. I used another piece of the patterned paper from the kit to cut a label to add my sentiment on to with purple ink. I also added a turquoise felt flower to the butterfly strip and then added more clear Nuvo crystal drops. The whole piece is added on to a piece of purple striped patterned paper from the kit and added to my card base, which again is a top folding 5.5 by 4.25.


DSC03001

Hope you like these, I had a blast making these using different techniques. If you have any questions or comments leave them in the comments section. Have a great day.