HALLOWEEN POCKET LETTERSPELLBINDERS DIE SET #NEVERSTOPMAKING WE R FLIP OVER TAGS

IMG_2024

FUN HALLOWEEN POCKET LETTER I MADE USING SPELLBINDERS SMALL DIE OF THE MONTH DIE CUTS AND SOME OTHER DIES FROM ALI EXPRESS.

IMG_2023

I ALSO MADE THESE CUTE TAGS USING THE WE R MEMORY KEEPERS FLIP OVER TAG SET. I PUT SOME GLASSINE BAGS INSIDE FILLED WITH SOE DIE CUTS FOR MY SWAP PARTNER.

MAGGIE HOLMES POCKET LETTER

DSC03168

Maggie Holmes Pocket Letter I created for swap.

DSC03171

Bows I created using my new bow die I got from
Aliexpress using the Maggie Holmes paper collection.

DSC03170

Tags and embellishment pieces I also made using the paper line.

DSC03172


These embellishments I made with some new Sizzix dies and also a cute Unicorn die I also purchased from Ali Express. It turned out so beautiful.

#SPELLBINDERS #NEVERSTOPMAKING CARD AND BOOK MARK CREATED WITH SMALL DIE OF THE MONTH BYMONTI #THEPOLKADOTPINECONE

IMG_1974

My first project using the small die of the month dies from Spellbinders was this sort of shabby chic card. I used one of the frame dies to cut out the brown piece of card stock and layered it on top of another spellbinders die that I had in my stash. I cut out the birds and flower from light pink felt and layered them on top. I added a little bling for the birds eyes and the flower centers. I layered that all on top of another piece of patterned paper from Prima and then mounted that on a brown card base.

IMG_1975

My next project I made a book mark from some pretty patterned paper in the long tag shape from Elizabeth Crafts die set. I cut out some more of the birds and the small flourishes that are from the Spellbinders set with gold foil paper and mounted them length wise on the tag and then I cut one of the other frames from the set in a coordinating patterned paper and mounted it cross ways on the tag and topped it off with the Love word punch from Teresa Collins. I added a gold hole reinforcer on the top and then ran the whole thing through my laminator and then cut out around the shape and tied some bakers twine on the top. I think they both turned out pretty cute. You can do a lot of things with dies that come in the set. Thanks for stopping by.

Tag card using Spellbinders small die of the month die set. #NeverStopMaking

IMG_1470

Another project using the Spellbinders small die of the month May 2018 set. I made this tag card using the Celebrate word from the die set.

I cut the tag from some patterned paper from Crate paper and some chipboard and layered them together for strength. I tied a piece of ribbon on top to hang the tag. I layered some die cuts, including the celebrate word cut on top of the pink circle. Then I applied some Nuvo drops in lemon yellow to finish  off the card. I also add a gift card pocket from Lawn Fawn  onto the back of the tag so I would have a place to hold a gift card. I can just insert this whole tag into an envelope and deliver it like that or I could tie it to a gift. By the way I did a process video on this but some how messed it up and didn’t get it uploaded properly. I’ll do better next time.


Thanks for visiting and if you haven’t done so yet hit the subscribe button for notifications of future blog posts. If you have any questions leave them in the comment section below and I will get back to you.

Spring Flip book

DSC02913

Front cover of the flip book, it was thick so I wrapped bakers twine around for the closure. The base for my book is a card stock CD case. I added lots of die cuts, a wood photo frame, flowers, and gems and doilies.

DSC02916

I used the Welcome Spring paper collection from American Crafts.

DSC02917

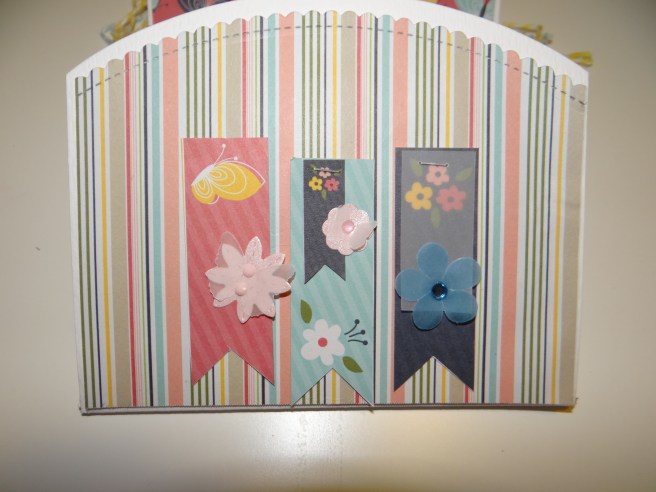
Opening the top flap. I have a doily and then a wood arrow I colored with my Copic markers and then added flowers and bling to it. Three flags from the paper collection are affixed on the bottom flap with a few tiny flowers added on top.

DSC02919

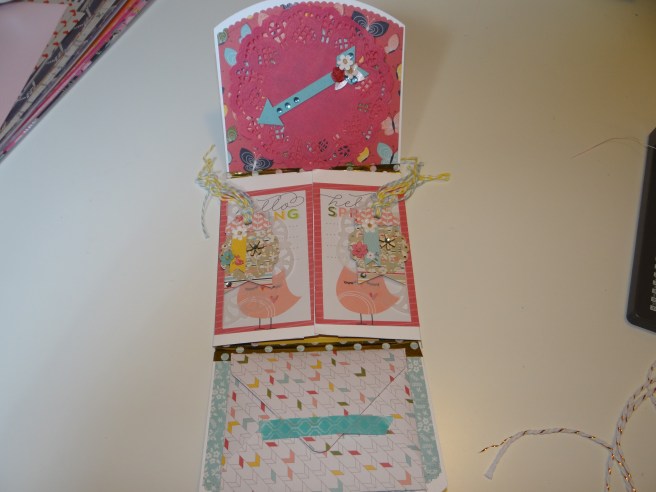
Bottom and top flap opened to show the two small flaps that open to the sides. Each side id covered with a piece of patterned paper and then I added a vellum doily on top of that. Then I created two matching tags to layer on each side. The tags have twinewith  tied on top and are layered with flowers, small doilies and bling. The bottom flap has an envelope I made to put some goodies inside for the recipient and then taped closed with some washi tape.

DSC02920

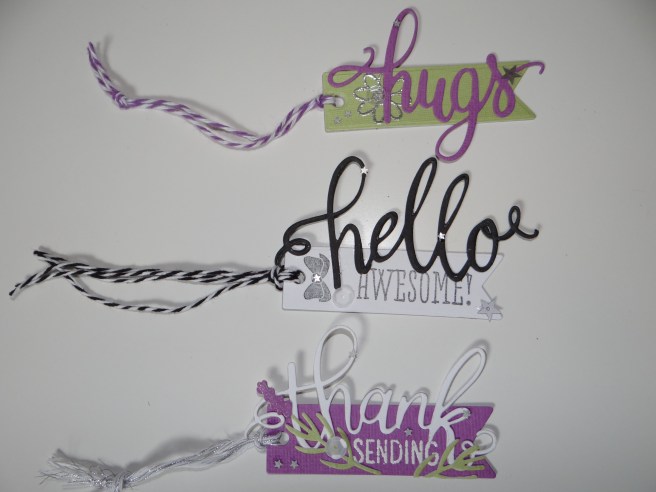
A close up of the tags.

DSC02918

The other bottom flap has a die cut swan on it and then the other flap has another cute envelope I made using the paper collection that houses more goodies. I have washi tape on all the seams even though this one was piece of paper to begin with so I didn’t need it to hold the flaps together, it was just for decoration.

DSC02921

The inside base has a paper piece from the collection that I added some embellishments to. The inside of each of the side flaps I covered with some patterned paper and scalloped the edges and then layered some ribbon and paper pieces from the collection and stapled on wiith my mini stapler from Tim Holtz. I finished them off with a wood piece.

DSC02922

The next top flap has a piece from the collection that I taped down on the sides and then cut a little piece down the middle and folded back so you can reach in and get the note out to read. I used turquoise mini glittered letters to spell the word note. The top of that page has a vellum envelope I created with my We R Memory Keepers envelope punch board. I added some embellishments inside and then put a small die cut bow for the closure. I adhered that with a paper clip banner that I made.

DSC02924

A close look at he bottom front flap.

A fun project to make that you can customize for any occasion.

Cute tags using #Heroarts march card kit. byMonti thepolkadotpinecone

DSC02946

Made these cute little tags using supplies from the March #mymonthlyherokit. I used the tag die from the kit and cut out the different color tags and then stamped on them using some of the other stamps from the kit. I then adhered the big word die cuts I cut using the dies that also came in the kit. I put some coordinating bakers twine through the holes to be able to attach my tags. I finished them off by adding some of the stars and sequins included in the kit also. Super cute and easy tags. Love the #Heroarts card kits.